
Collecting Data

Spryly strives to enable powerful interactions to occur between people using their mobile devices, often utilizing QR codes to facilitate the sharing of contact and event details. However, the platform is even more powerful when you begin to explore what can be done with Spryly Stories and, now, Spryly Data Collections.
Definitions and Forms
Data Collections in Spryly consist of two main elements: the data collection definition (describing what you want to collect; essentially defining a self-contained database) and forms that you share that are used to collect your information.
Simple examples you could use Data Collections for might include a survey you share with your customers asking about features they’d like to see in a future versions of your product. Or, perhaps, it’s a check-in form used at a volunteer event. Maybe for fun you create a data collection to share it with your friends asking which movie they think will win an Academy Award.
Spryly stores data based upon the design of your collection. As noted above, Data Collections are like mini-databases. You define the columns by assigning them names and types, such as text fields, date & time fields and multiple choice fields, to name just a few.
Data are stored by Spryly and available for download at any time. When you download your data it will be exported in Comma-Separated-Values (CSV) format which you can subsequently load into a spreadsheet program such as Microsoft Excel, Google Sheets or Apple Numbers.
Creating a new Data Collection
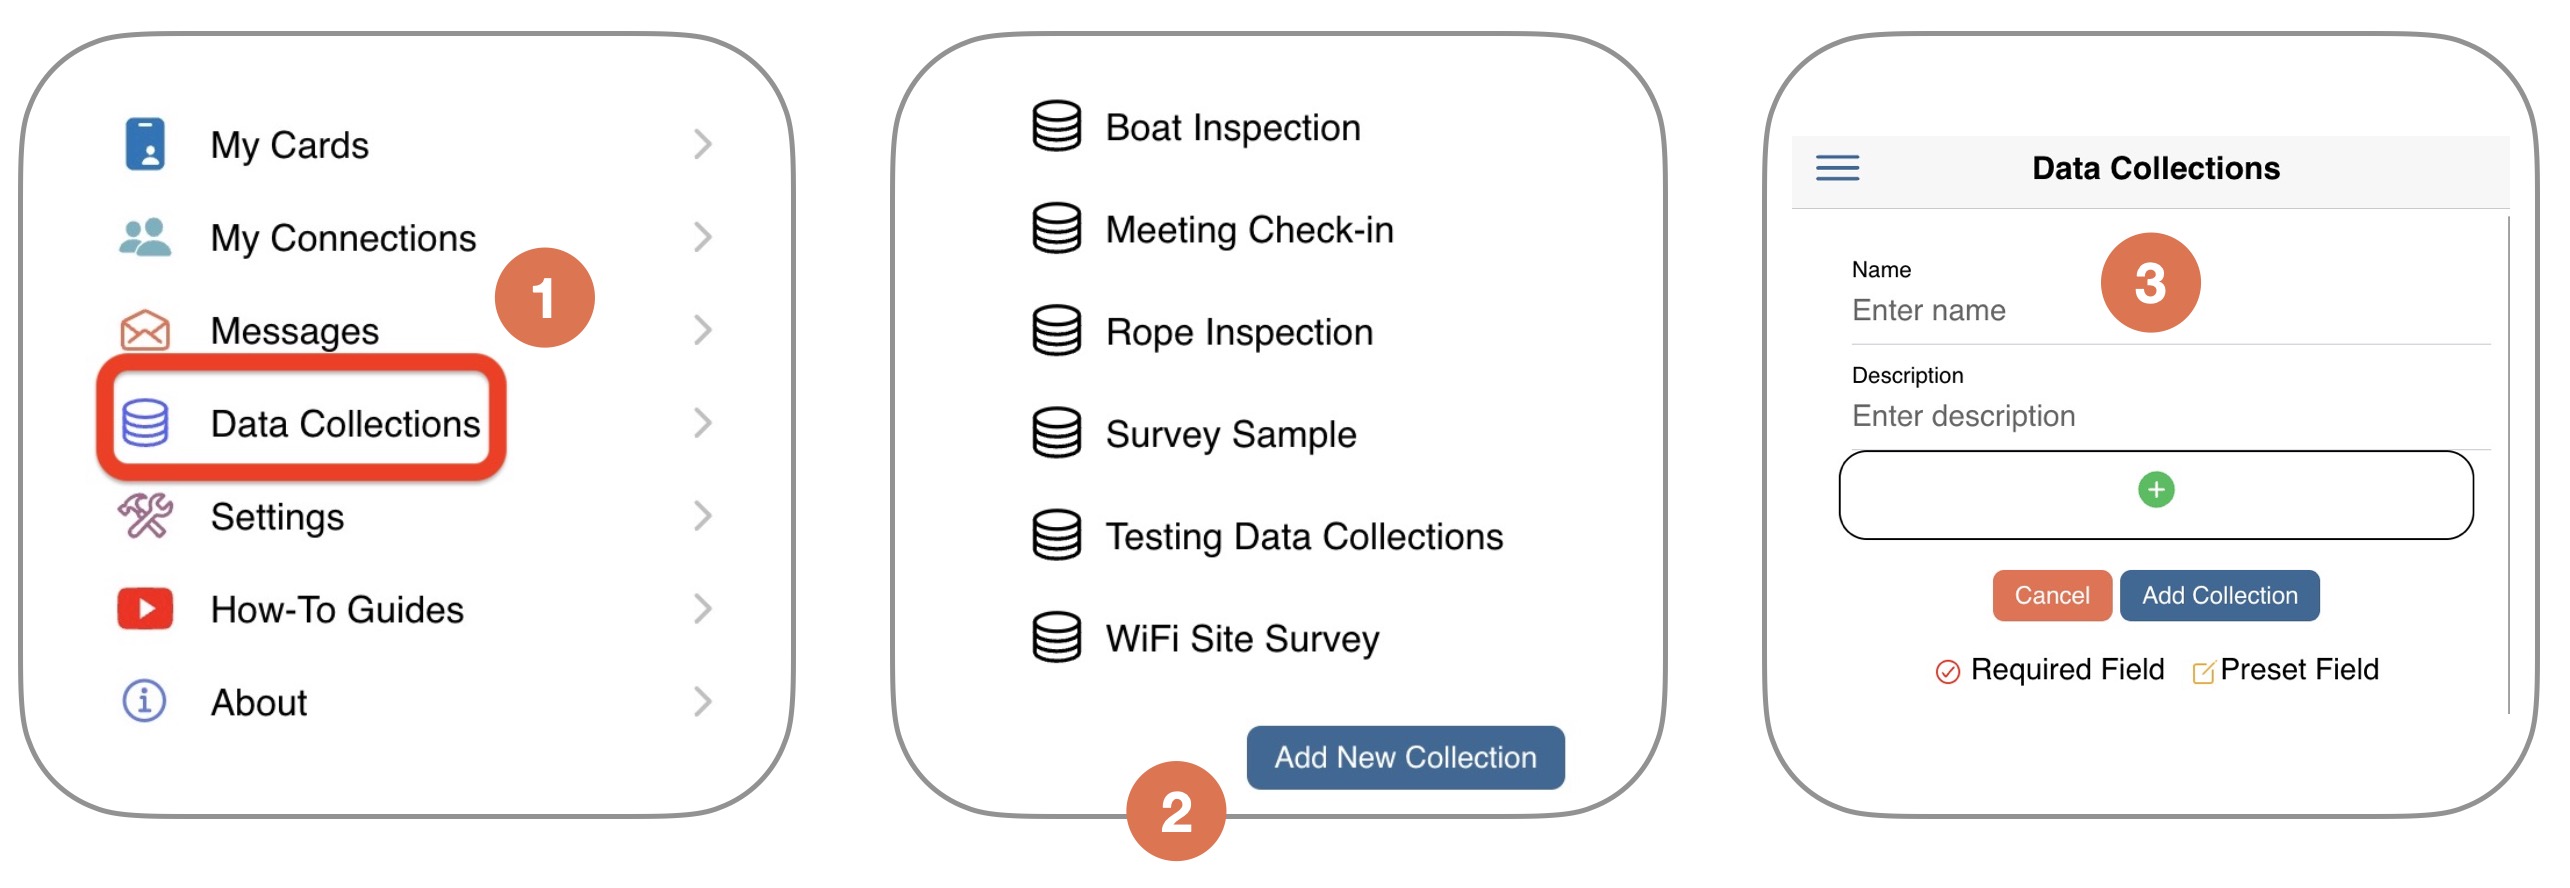
Creating a new Data Collection starts through the side menu. Open the side menu and then select the row labeled Data Collections. As soon as you do you'll see a list of any previously createrd data collections and a button allowing you to start crearing a new one. Pressing that button will reveal a form allowing you to name your collection and provide a brief description.
Adding Fields
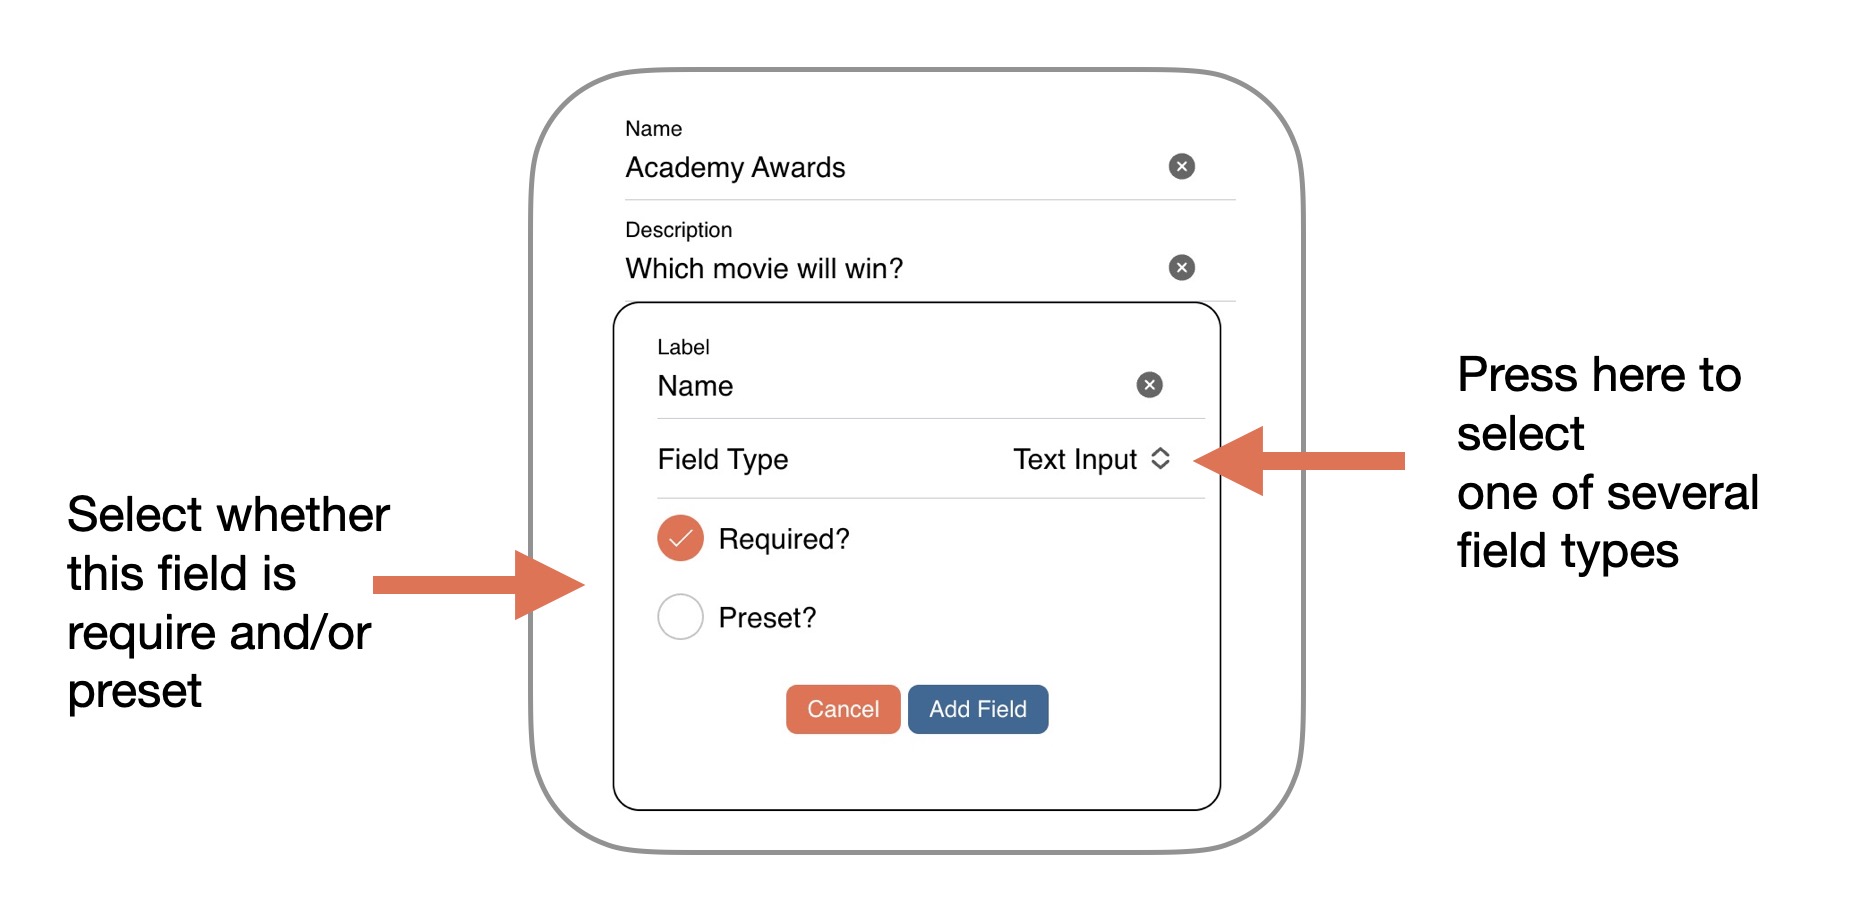
To begin creating fields (columns) for your collection, press the green circle with the plus-sign icon. The screen will change, again, to reveal another form where you'll be able to add a label to your field, select its type and determine whether it will be required and/or preset.
Types of Fields
Spryly Data Collections currently support the following types of fields:
- Text input
- Multi-line text input
- Multiple choices (selecting one or multiple items)
- Date & time
- Numeric
- Telephone
- Yes/No
Each field has a label associated with it. That's what will appear when the form is displayed (see Using Data Collections, below). You can change field labels and types at any time. However, if you modify the collection by changing a field's type and have already collected data, the new data collected may not conform to the format or type of data previously acquired and stored.
Text Input: This is the most basic field type. When displayed, the user will be presented with a label and a single input field. No special data checking is performed. Almost anything entered by the user will be accepted and stored.
Multi-line Text Input: This type of field is similar to the regular text input field except that the user interface shows a larger field that can accept multiple lines of content. This would be useful anywhere that called for collecting more detailed information such as a notes or additional comments field.
Multiple Choice: As its name implies, this field allows you to present a list to the user and have them select one or more items (depending upon the field attribites; see below). The example of creating a survey asking your friends which movie they thought would be the winner in the Academy Awards would utilize a field such as this.
Date & Time: Use this anywhere you'd like to capture the date & time from the user. Currently both are required. When the form for this collection is first drawn the current local date and time are always used.
Numeric: Numeric fields only allow numerals to be entered.
Telephone: This field was designed to accept telephone numbers that adhere to the 10-digit US format. Future updates will allow this field to be modified to accept and support phone numbers conforming to other, more international standards as well as being able to select a country code.
Email: This field will check to make sure that the entered data conforms to the format of a valid email address. If the form is submitted with invalid data the user will receive a warning message. If less stringent checking is desired it's recommended that a Text Input field be used instead.
Yes/No: A Yes/No field type presents a toggle switch that can be set to off (default) or on. The exported data will be either YES or NO.
Field Attributes / Modifiers
Some fields have specific attributes that determine how data will be collected. For Mutliple Choice fields you can mark the checkbox labeled Multiple Selections Allowed to instruct Spryly to collect multiple items from the list associated with this field. When exported, these choices will be comma-separated.
Every field can be marked as Required. Doing so means that some value will be required for that field before the form can be submitted by a user. They'll recognize which fields are required because a red asterisk will be appended to the field label.
A field can also be marked as Preset to indicate that data will come from the Story containing the data collection and not the form presented to the user. In other words, it allows one data collection design to be shared and used for multiple purposes, with one or more fields setup so that their values are, essentially, preset.
As an example, suppose you created a generic inspection form representing a piece of equipment that needs inspection at multiple locations or plants. While you could easily have a field marked location with a list of places, you might need that location to be more specific and not something the person submitting the report would need to know about. A seperate and more detailed overview of this feature will appear in another post.
Using Data Collections
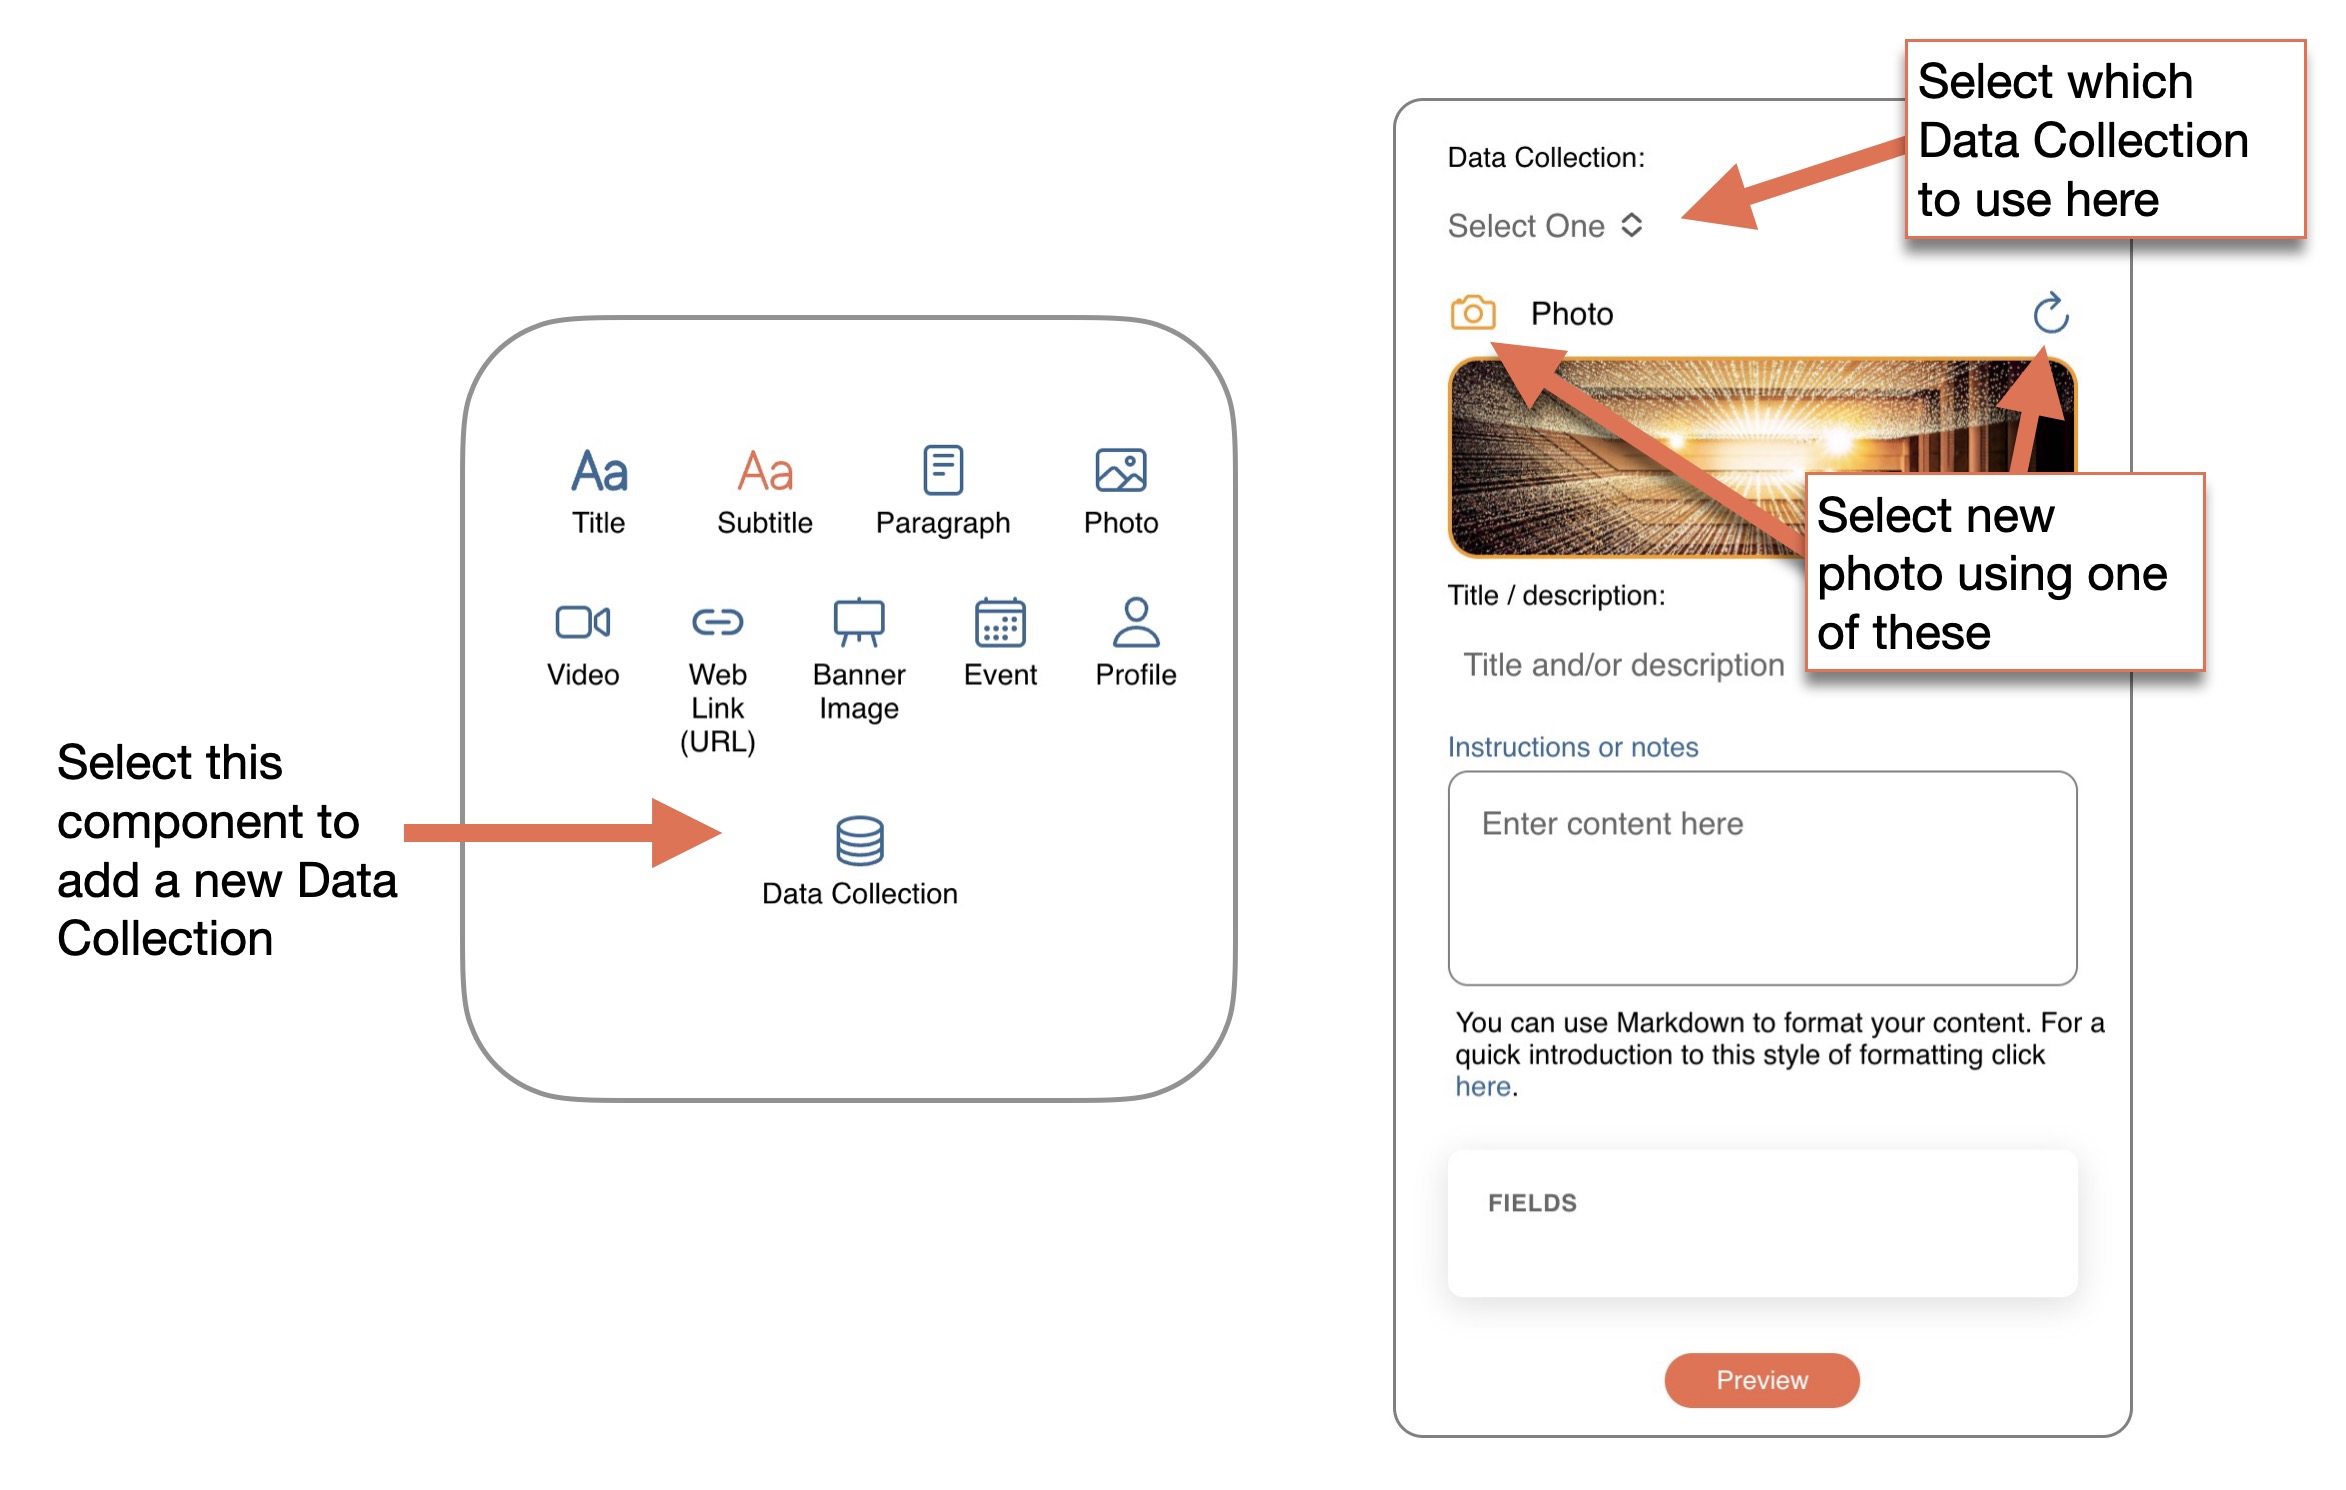
Data Collections are designed to live inside of Spryly Stories. So, to use them, go into a new or existing Story and edit it. Add a new component and select the one labeled Data Collection. A new form will appear and allow you to select which Data Collection to use as well as providing a photo, title and instructions that will be presented to the user.
To preview what the form will look like and how it will behave, press the button labeled Preview. Please note that data won't be collected or saved in those mode. To perform a real test, save your Story and open it up via a shared URL in your web browser.
Exporting Data
If you've collected data through your form it's easy to pull it out by downloading a file in CSV format and viewing it inside of a spreadsheet such as Microsoft Excel, Google Sheets or Apple Numbers. Perform these steps to export data:
- Open the Data Collections list from the side menu
- Slide left on the Data Collection you'd like to export data from
- Chose the Options item
- Select the item labeled Export Data
Erasing Data
Data for can be deleted from your Data Collection by performing these steps:
- Open the Data Collections list from the side menu
- Slide left on the Data Collection you'd like to export data from
- Chose the Options item
- Select the item labeled Erase Data
This action can't be undone. Be sure you want to delete your data before performing this step. As a precaution, export the data first.
Sharing Collection Definitions
This feature has been asked for by several users and it's currently under development. When available, it will allow you to share the design of one of your data collections with another Spryly user, or shared with several people if your account is part of an enterprise.


